
To connect JumpCloud to TimeClock 365, create a custom SAML 2.0 application in the JumpCloud Admin Portal, copy its IdP metadata URL into the JumpCloud card under Settings > Integrations in TimeClock 365, and turn on "Enable login via JumpCloud". For automatic user provisioning, generate a JumpCloud token in TimeClock 365 and paste it, with the TimeClock 365 SCIM base URL, into the application's Provisioning tab in JumpCloud. Employees then sign in with their JumpCloud account, and new users and groups reach TimeClock 365 without manual setup.
One identity for every employee means fewer passwords to reset and no forgotten accounts when someone leaves.
Before you start
- A JumpCloud administrator account (Admin Portal).
- A TimeClock 365 administrator account at live.timeclock365.com.
- Employees' email addresses in JumpCloud match their email in TimeClock 365. JumpCloud sends the email address as the SAML NameID by default.
Part 1: In JumpCloud - create the SAML application
- Log in to the JumpCloud Admin Portal.
- Go to Access > SSO Applications and click + Add New Application.
- Click Select on the Custom Application tile (or search for Custom SAML App) and click Next.
- Select Manage Single Sign-On (SSO), choose Configure SSO with SAML and click Next.
- Enter a Display Label, for example "TimeClock 365". Users see this name in the JumpCloud User Portal.
- Click Save Application, then Configure Application.
- Enter the TimeClock 365 service provider values:
- SP Entity ID (audience):
https://live.timeclock365.com/saml/metadata - ACS URL (SSO URL):
https://live.timeclock365.com/saml/login_check - Login URL (for sign-in started from TimeClock 365):
https://live.timeclock365.com/login
- SP Entity ID (audience):
- Leave SAMLSubject NameID set to email.
- Click save.
- Open the application again and click Copy Metadata URL. You will paste this URL into TimeClock 365. (Export Metadata downloads the same metadata as a file.)
- Open the application's User Groups tab, tick the user groups that should use TimeClock 365 and click save. JumpCloud denies access to applications by default, so only users in these groups can sign in.
Part 2: In TimeClock 365 - connect JumpCloud
- Log in to TimeClock 365 as an administrator.
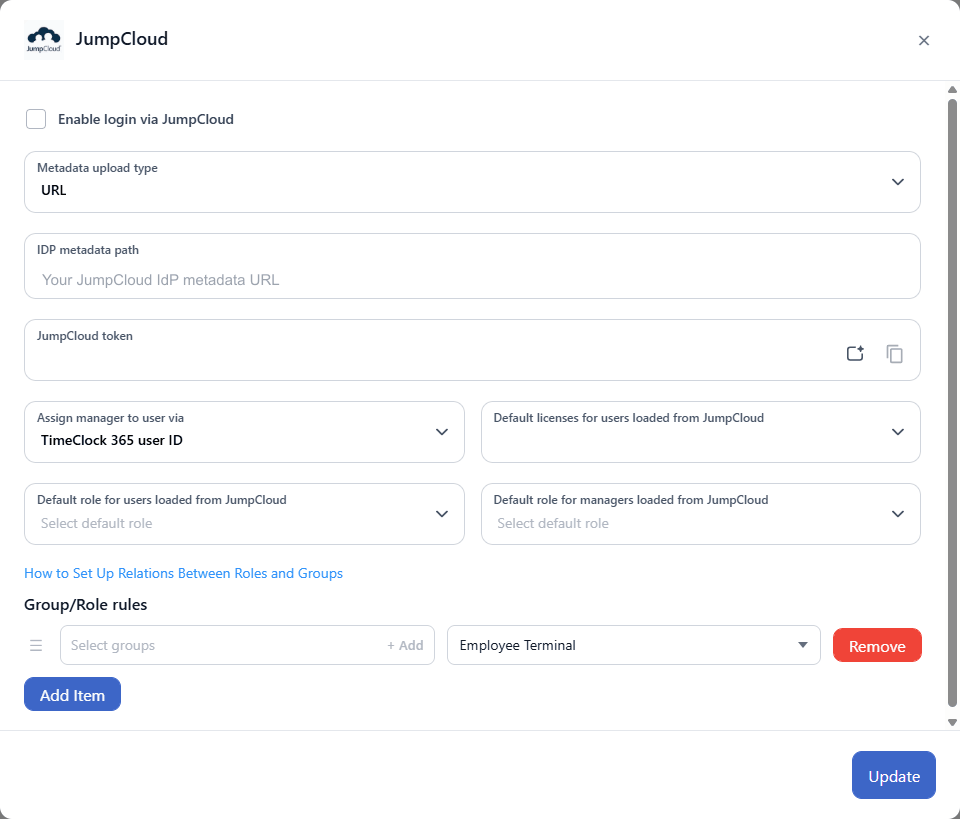
- Go to Settings > Integrations and open the JumpCloud card ("Configure login and automatic user provisioning for JumpCloud").
- Tick Enable login via JumpCloud.
- In Metadata upload type, choose URL (or another available type if you exported the metadata as a file).
- In IDP metadata path, paste the metadata URL you copied from JumpCloud.
- In Assign manager to user via, choose how TimeClock 365 links each user to their manager, for example TimeClock 365 user ID.
- In Default licenses for users loaded from JumpCloud, choose the license new users receive.
- In Default role for users loaded from JumpCloud and Default role for managers loaded from JumpCloud, choose the roles that apply when no group rule matches.
- Click Update to save.
Part 3: Automatic user provisioning (SCIM)
Provisioning lets JumpCloud create, update and deactivate TimeClock 365 users for you. It is separate from login: SSO handles sign-in, provisioning handles the user list.
In TimeClock 365
- In the JumpCloud card, find the JumpCloud token field.
- Click the generate icon (left) to create a token.
- Click Update to save the new token.
- Click the copy icon (right) to copy the token.
In JumpCloud
- Go to Access > SSO Applications and open your TimeClock 365 application.
- Select the Provisioning tab (some JumpCloud consoles call it Identity Management).
- Enter:
- Base URL:
https://live.timeclock365.com/scim/ - Token (Token Key): the JumpCloud token you copied from TimeClock 365
- Test User Email: an email address that does not exist in TimeClock 365. JumpCloud uses it to create, read, update and delete a test user.
- Base URL:
- Click Test Connection and wait for the success message.
- Click Activate. Do not click Save at this step: JumpCloud's documentation notes that Save discards the new configuration.
Users in the user groups bound to the application are now provisioned to TimeClock 365. If activation fails with a group error, JumpCloud's documentation suggests turning off Enable management of User Groups and Group Membership in this application and activating again. If you replace the token later, paste the new value and click Update in JumpCloud.
Map JumpCloud groups to TimeClock 365 roles
Groups come from JumpCloud. Roles in TimeClock 365 decide what each user can see and do. TimeClock 365 has four roles: Administrator, Group Manager, Employee and Employee Editor.
- In the JumpCloud card, go to Group/Role rules.
- Click Add Item.
- In the left field, select one or more JumpCloud groups. In the right field, select the role they get.
- Repeat for each group. Click Remove to delete a rule.
- Click Update.
If a user belongs to several groups with different rules, TimeClock 365 applies the rule that appears higher in the list. Users who match no rule get the default role you chose above. The How to Set Up Relations Between Roles and Groups link in the card opens more help on this.
Test the login
- Keep the TimeClock 365 settings tab open.
- Open a private (incognito) browser window and sign in to TimeClock 365 with a JumpCloud user who belongs to an assigned group.
- If the sign-in works, you are done.
- If an error appears, go back to the open settings tab, untick Enable login via JumpCloud, click Update and check the metadata URL and the JumpCloud application settings.
Frequently asked questions
Where do I connect JumpCloud in TimeClock 365?
In TimeClock 365, go to Settings > Integrations and open the JumpCloud card. There you enable login via JumpCloud, paste the JumpCloud IdP metadata URL, generate the provisioning token and map JumpCloud groups to TimeClock 365 roles.
Which JumpCloud application type should I use for TimeClock 365?
Use a custom SAML 2.0 application in the JumpCloud Admin Portal (Access > SSO Applications > Custom Application). Set the SP Entity ID to https://live.timeclock365.com/saml/metadata and the ACS URL to https://live.timeclock365.com/saml/login_check.
What is the SCIM base URL for TimeClock 365?
The TimeClock 365 SCIM base URL is https://live.timeclock365.com/scim/. In JumpCloud, enter it on the application's Provisioning tab together with the JumpCloud token generated in the TimeClock 365 JumpCloud card.
How are TimeClock 365 roles assigned to JumpCloud users?
In the TimeClock 365 JumpCloud card, Group/Role rules link JumpCloud groups to TimeClock 365 roles. When a user is in several groups, the rule higher in the list wins. Users with no matching rule get the default role for users or managers loaded from JumpCloud.
Why can't a JumpCloud user sign in to TimeClock 365?
JumpCloud denies application access by default, so the user must belong to a user group bound to the TimeClock 365 application. Also check that "Enable login via JumpCloud" is ticked in TimeClock 365, that the IDP metadata path is the JumpCloud metadata URL, and that the user's email matches in both systems. If it still fails, open a TimeClock 365 support ticket.
Related guides
- Okta Provisioning Setup
- Okta groups and roles
- SAML Sync Between TimeClock 365 and Azure Active Directory
- Active Directory Integration Setup
- Open a support ticket