
A TimeClock 365 biometric clock sends every punch to the TimeClock 365 cloud over the internet. If the clock is disconnected, punches stay saved on the device and don't appear in the web portal until it reconnects. This guide shows how to connect the clock with a network cable (Ethernet) or Wi-Fi.
This guide is for TimeClock 365 biometric clocks with a 2.8, 3 or 3.5-inch color screen. Menu names can differ slightly between models and firmware versions.
Open the communication settings
- On the clock's main screen, press M/OK.
- Press ► to select Comm. and press OK.
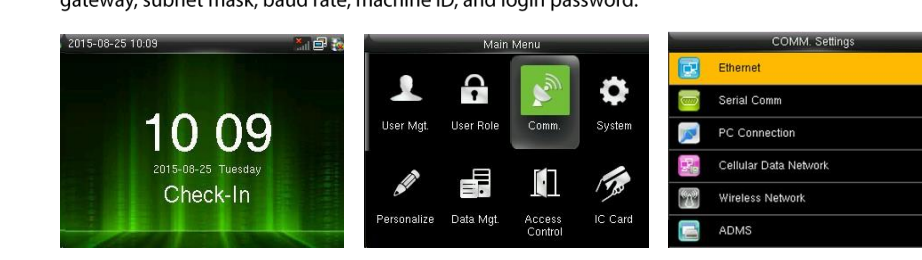
Option 1 - Network cable (Ethernet)
- Connect a network cable from your router or network switch to the clock.
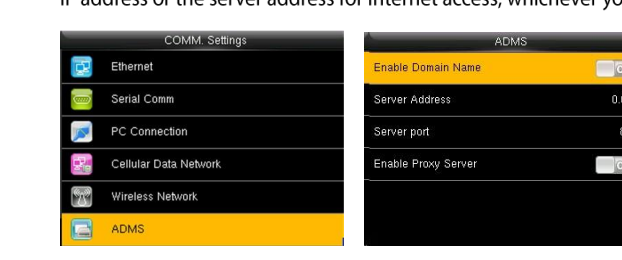
- In COMM. Settings, select Ethernet and press OK.
- For most networks, turn DHCP on so the router gives the clock an IP address automatically. If the clock doesn't connect, turn DHCP off and on again to refresh the IP address.
- If your network uses fixed addresses, turn DHCP off and enter the IP Address, Subnet Mask, Gateway and DNS from your IT team. The IP address must not be the same as another device on the network.
- Press ESC to exit the menus.
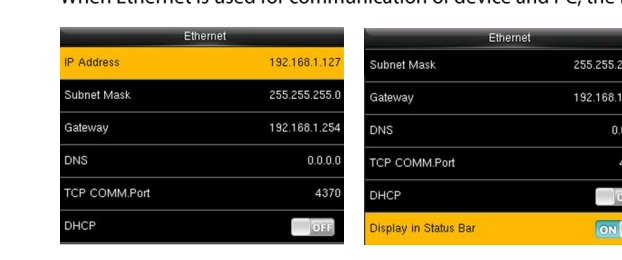
Keep Display in Status Bar on, so the network icon shows on the main screen.
Option 2 - Wi-Fi
Available on clocks with a built-in or external Wi-Fi module.
- In COMM. Settings, select Wireless Network and press OK.
- Make sure WIFI is turned on, then select your network and press OK.
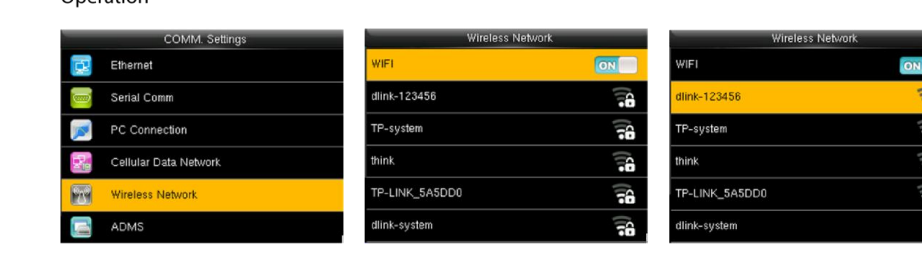
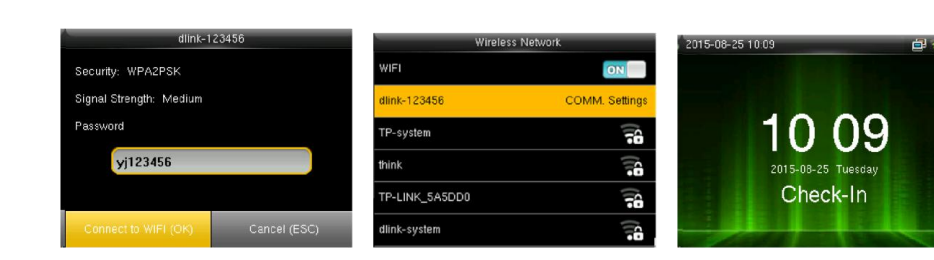
- Enter the Wi-Fi password and select Connect to WIFI (OK).
- When connected, the network shows as connected and the clock returns to the main screen.
Cloud server (ADMS) settings
The ADMS menu holds the cloud server address and port. TimeClock 365 clocks come configured for our server, so don't change these settings unless our support team asks you to.
Check that the clock is connected
- On the clock, the status bar on the main screen shows the network (Ethernet or Wi-Fi) icon and the server connection icon. A red mark on the icon means the connection failed.
- In the web portal, check the clock's Last connect time. See How to Check Clock / Controller Sync Status.
Once connected, the punches saved on the clock sync to the cloud and appear in the Detailed Attendance report. Still not syncing? See Time Clock Punches Not Being Recorded.
FAQ
How do I connect the biometric clock to the internet?
Press M/OK, open Comm. (communication settings) and choose Ethernet for a network cable or Wireless Network for Wi-Fi. With a cable, turning DHCP on lets the router give the clock an IP address automatically.
How do I know the clock is connected to the cloud?
A connection icon appears in the status bar of the clock's main screen, and the clock's Last connect time in the TimeClock 365 web portal is up to date.
Do I need to change the ADMS (cloud server) settings?
Normally no. TimeClock 365 clocks come configured for our cloud server. Only change the ADMS settings if our support team asks you to.
Need help? Open a support ticket.